# Source installation
TIP
This document takes the BTPanel 8.0.4 version and CentOS 8.5 system source code to install the BeikeShop system as an example.
Prerequisites:
- The PHP version installed in the BTPanel must be 8.2 or above, and the MySQL version must be MySQL 5.7 or above
- The BTPanel has installed Apache httpd 2.4+ or Nginx 1.10+
- Successfully logged into the Baota console
# Installation Steps
# 1. Configure PHP
# 1.1. Install Extensions
TIP
The BeikeShop system relies on the fileinfo extension to run. After Baota installs PHP, the fileinfo extension is not installed by default. You need to configure PHP before deployment. The following operations will guide you to install the fileinfo extension
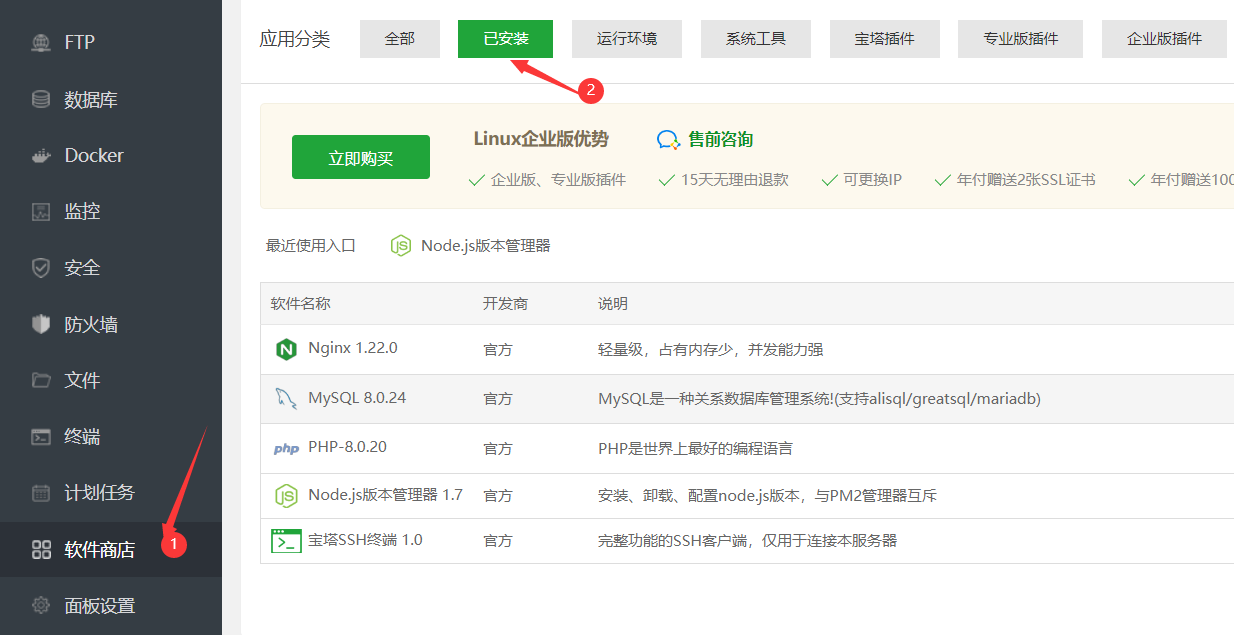
In the Baota console, click [Software Store] -> [Installed] to find the installed PHP software. As shown in the figure below
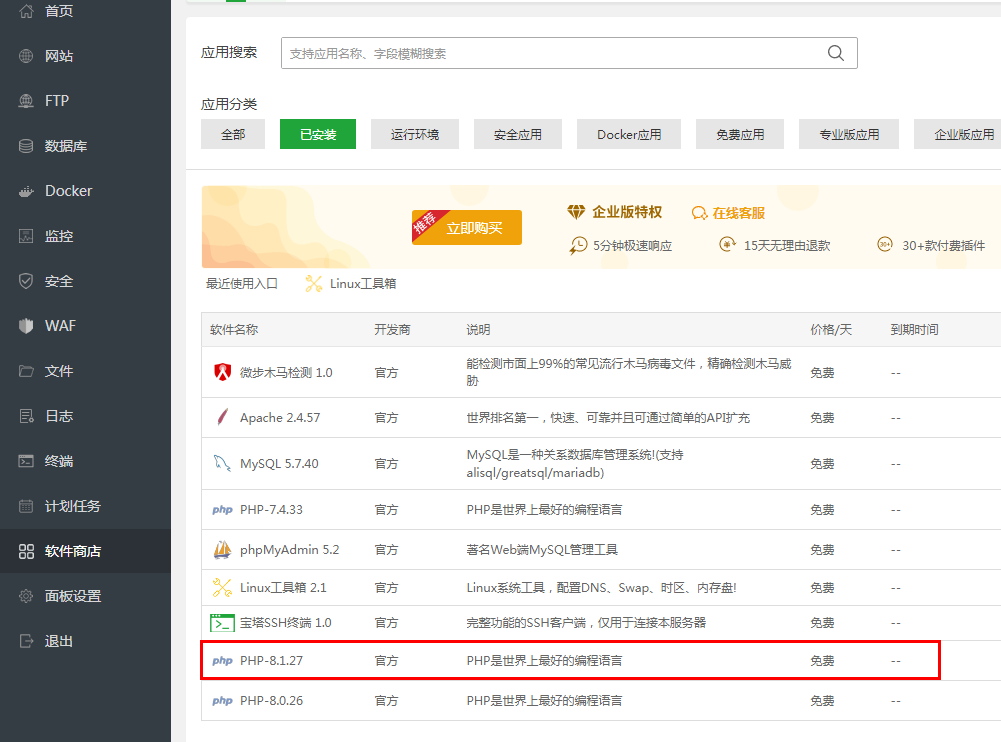
Click to select the PHP software name you want to use for the BeikeShop system (must be 8.2 or above).
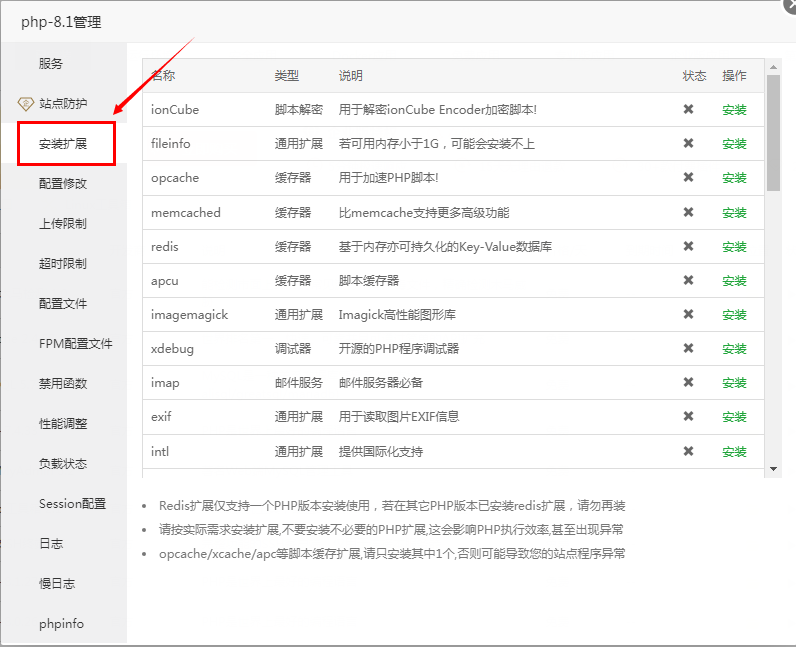
In the pop-up [PHP Management] window, click [Install Extension] to install the extension settings. As shown in the figure below
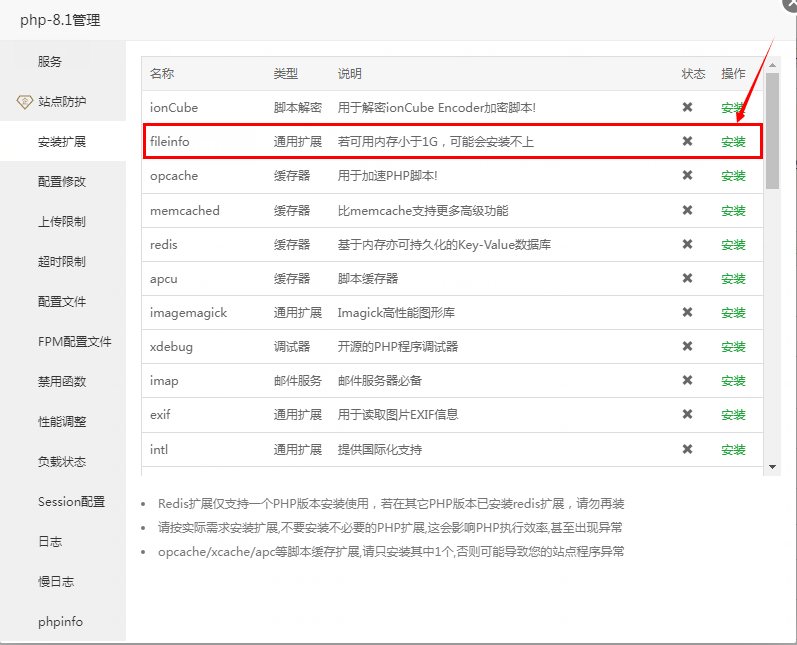
Select [fileinfo] and click [Install]. As shown below:
Wait for the installation to complete. After installation, you need to restart PHP.
# 1.2. Delete Functions
TIP
The BeikeShop system needs to delete the disabled functions putenv and proc_open, and PHP needs to be configured before deployment. The following operations will guide you to delete the disabled functions
In the [PHP Management] window, click [Disable Function] to enter the disabled function setting page, as shown below:
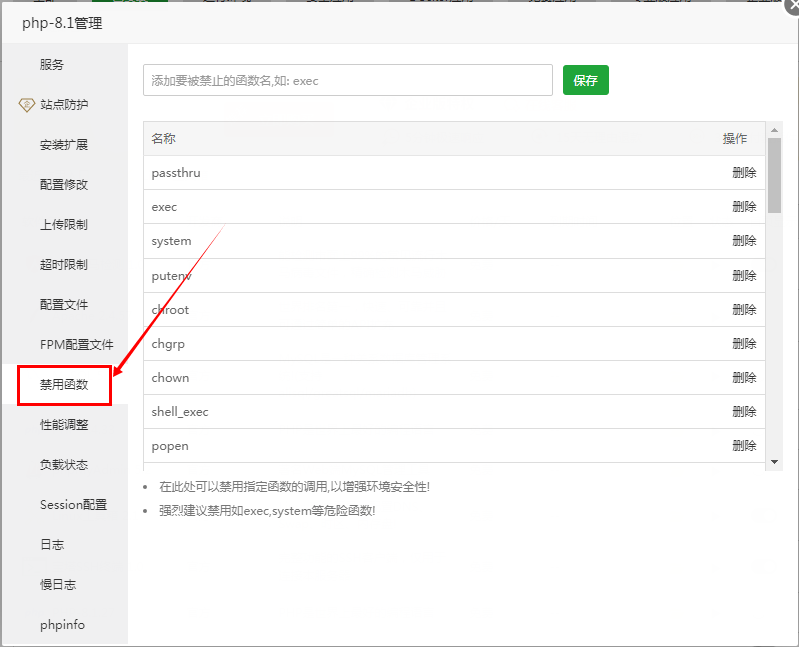
In the function list, click [Delete] function putenv, proc_open to delete the disabled function.
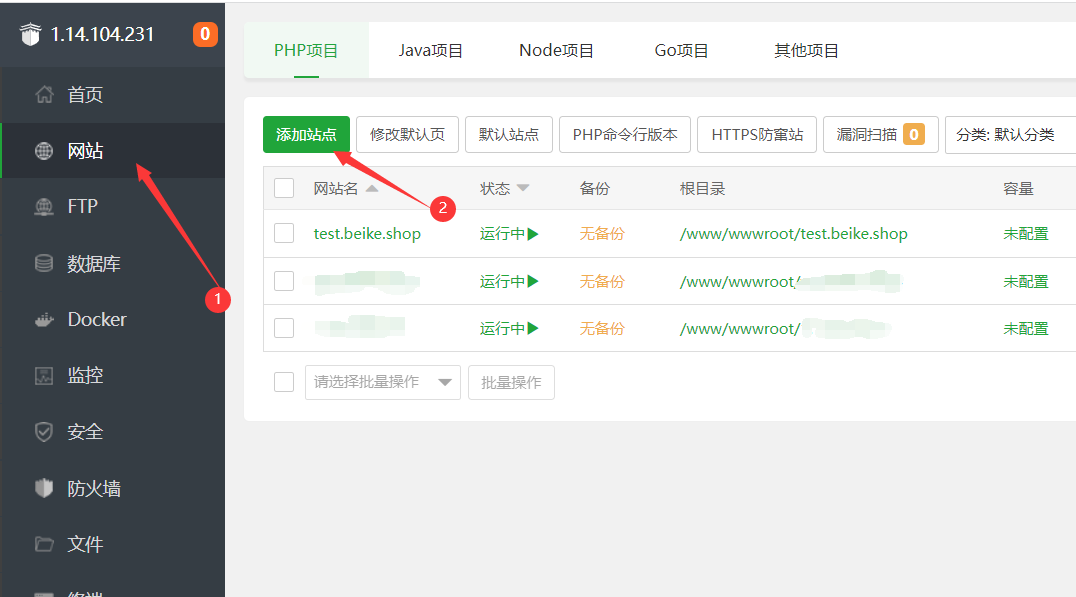
# 2. Create a site
In the Baota console, click [Website] -> [Add Site]. As shown in the following figure:
In the pop-up Add Website window, enter the relevant configuration information. As shown below
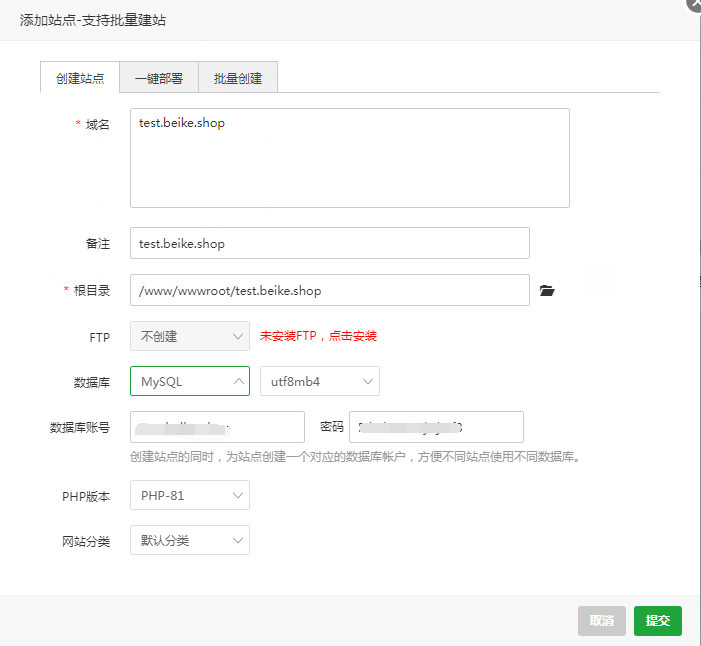
TIP
Domain name: Enter the domain name bound to the BeikeShop system.
Make sure that the bound domain name has been added with relevant resolution.
Remarks: Optional, you can add the website's remarks.
Root directory: The website file root directory. Generally, the default /www/wwwroot path is used.
FTP: Optional, you can create an FTP service. Not created by default.
Database: Optional, you can create a database in your server for use. The database type must be MySQL 5.7 and above. If you need to create a database in the server for use, please select [MySQL] [utf8mb4] and enter the database username and password.
Program type: PHP, not selectable by default.
PHP version: Please select the configured PHP version.
Website category: Default category. You can choose according to the actual situation.
Click [Submit]. The site will be created.
# 3. Get the source code for configuration
TIP
- Git has been installed on the host
- Composer version 2.0 or above, composer is installed by default after installing PHP in Baota version 8.0.4
- Nodejs 14+ has been installed on the host
The server enters the /www/wwwroot/test.beike.shop directory, test.beike.shop is the site directory, whichever is more appropriate
cd /www/wwwroot/test.beike.shop
Clone the source code
git clone https://gitee.com/beikeshop/beikeshop.git
Enter the beikeshop directory in the command line and execute composer install to install third-party packages
cd beikeshop

composer install
Then execute cp .env.example .env to create the configuration file
cp .env.example .env
Then execute npm install and npm run dev to compile the front-end js and css files
npm install

npm run dev
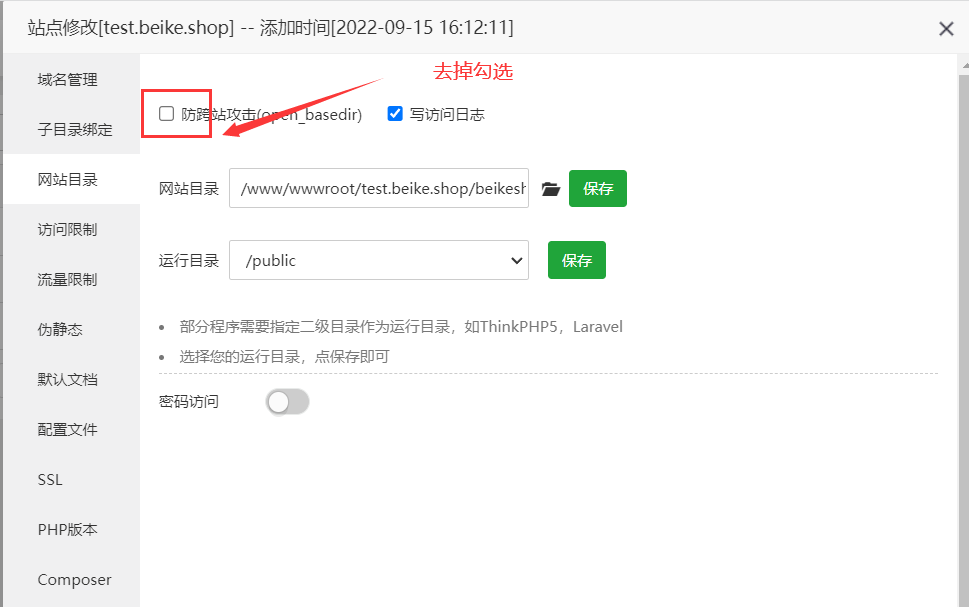
# 4. Set Website Root Directory
Set public in the project folder as the website root directory
In the Baota console, click [Website], select the created BeikeShop site, and click [Settings]. As shown in the following figure:

In the pop-up site modification window, click [Website Directory] to make relevant settings for the website directory. As shown in the figure below:
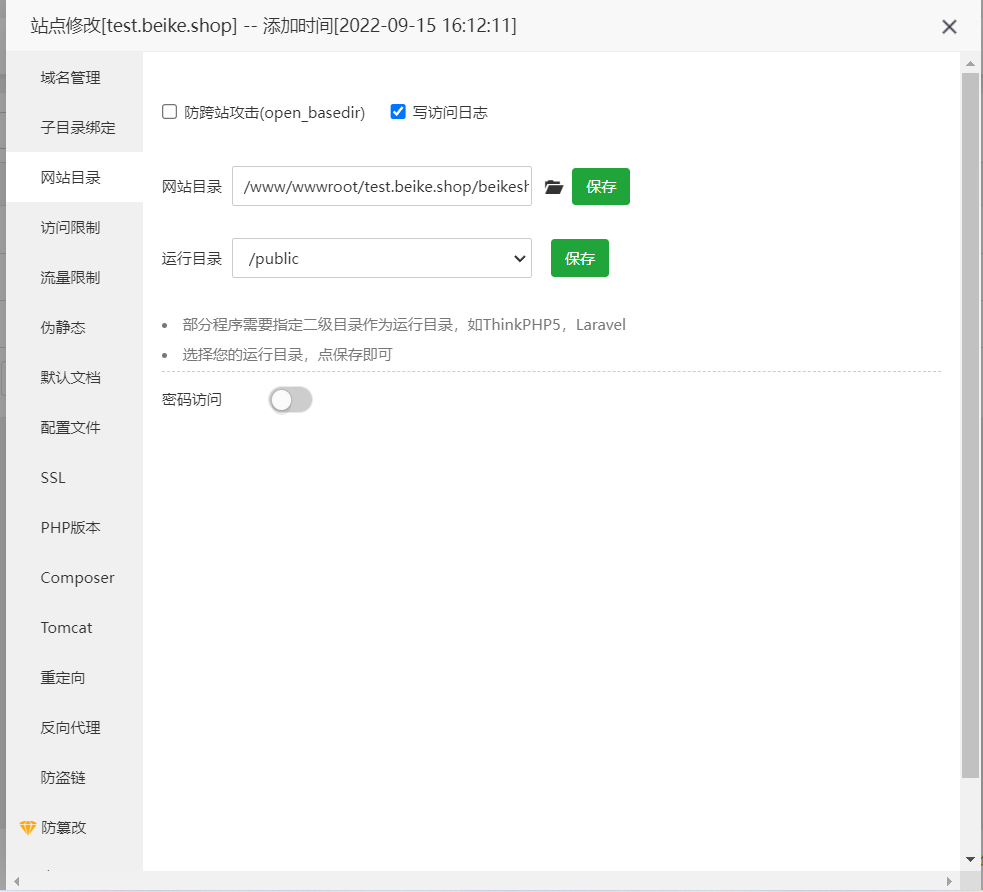
The website directory is set to:/www/wwwroot/test.beike.shop/beikeshop
The run directory is set to:/public
Remove the option to prevent cross-site attacks
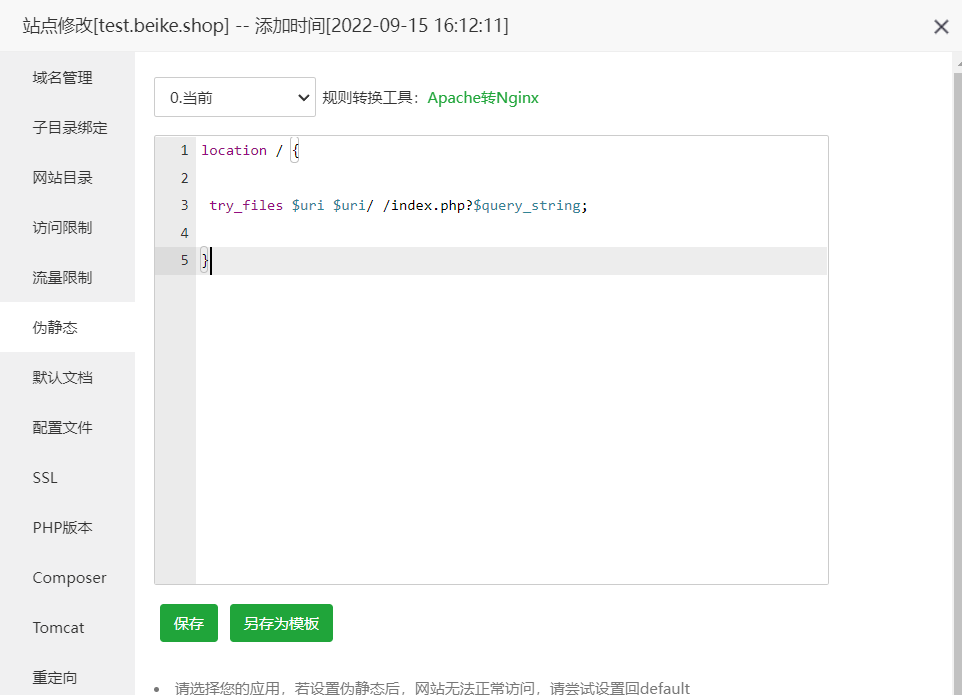
# 5. Configure Rewrite Rules (Nginx)
Nginx environment pseudo-static configuration (this step can be omitted if Apache is used)
In the Baota console, click [Website], select the created BeikeShop site, and click [Settings]. As shown in the following figure:

In the pop-up site modification window, click [Website Directory] to make relevant settings for the website directory. As shown in the figure below:

Enter the following content in the text box. As shown in the figure
location / {

 try_files $uri $uri/ /index.php?$query_string;

}
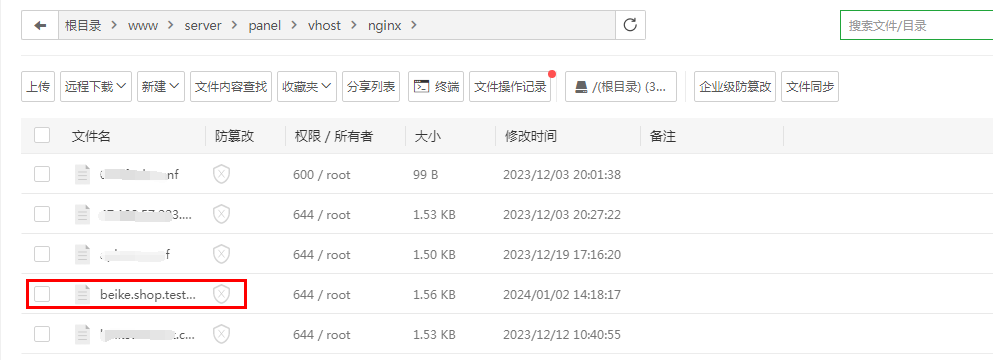
 You can also edit directly in the corresponding file (the file name is domain.conf). As shown below:

# 6. Modify Permissions
Change the permissions of the storge, public directories, and .env files to 755 or 777
# 7. System Installation
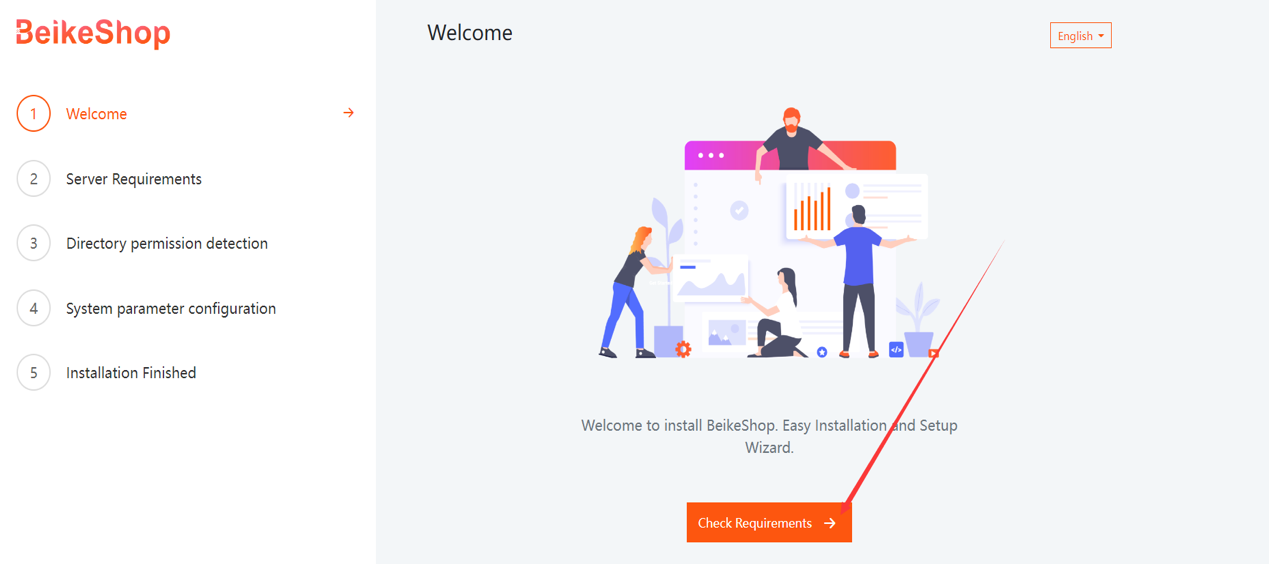
Enter the domain name test.beikeshop.com in the browser, and if the interface shown in the figure appears, you have successfully entered the installation page.
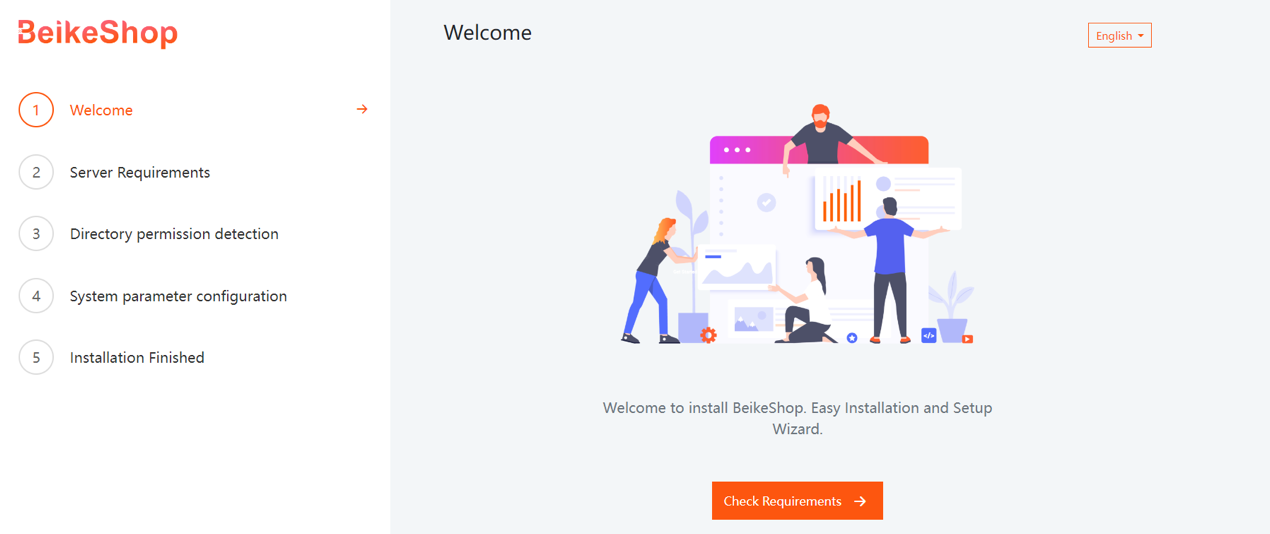
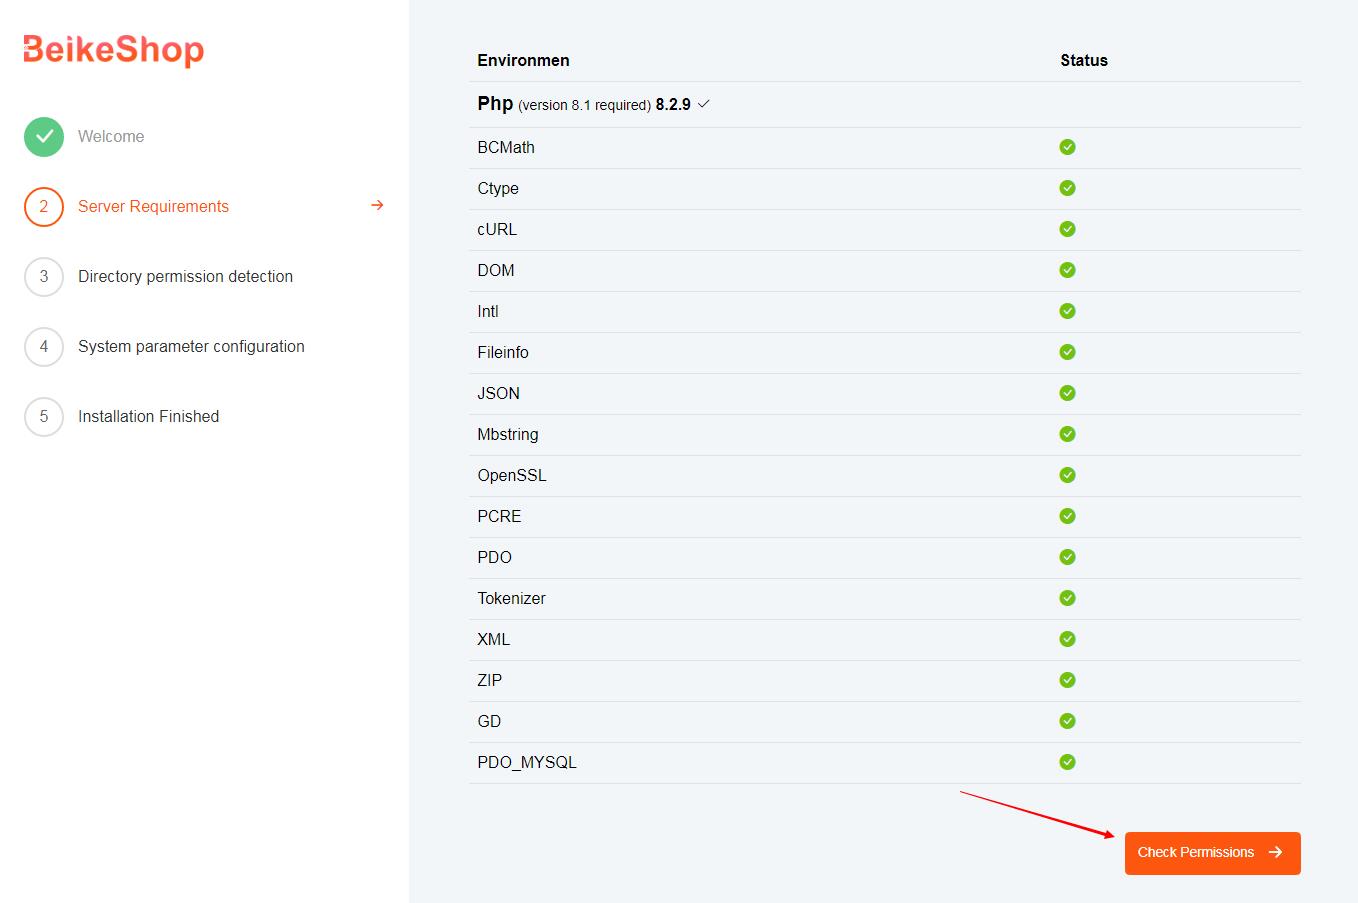
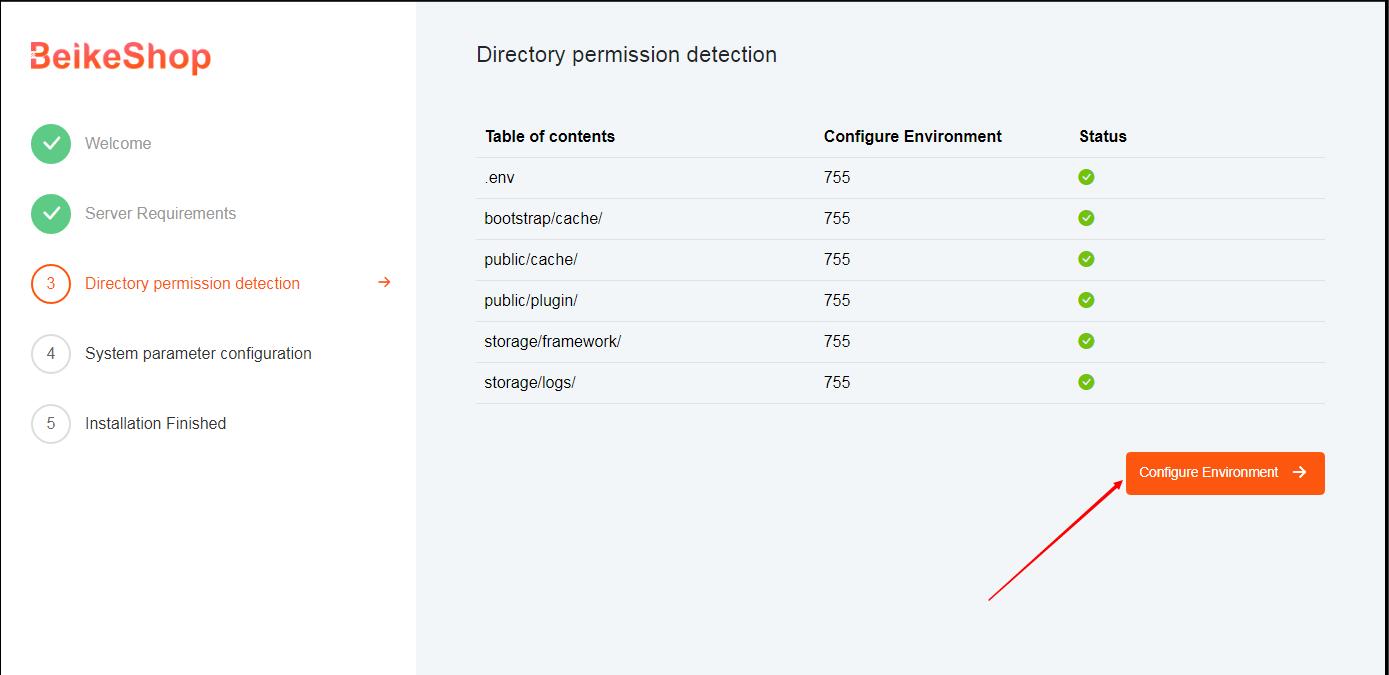
Click the buttons in order: Check Requirements, Check Permissions, Configure Environment, and finally Installation Finished to complete the process.
Step 1: Installation Interface
Step 2: Environment Check
Step 3: Directory Permissions Check
Step 4: Fill in the database and admin login information, then click the Install button
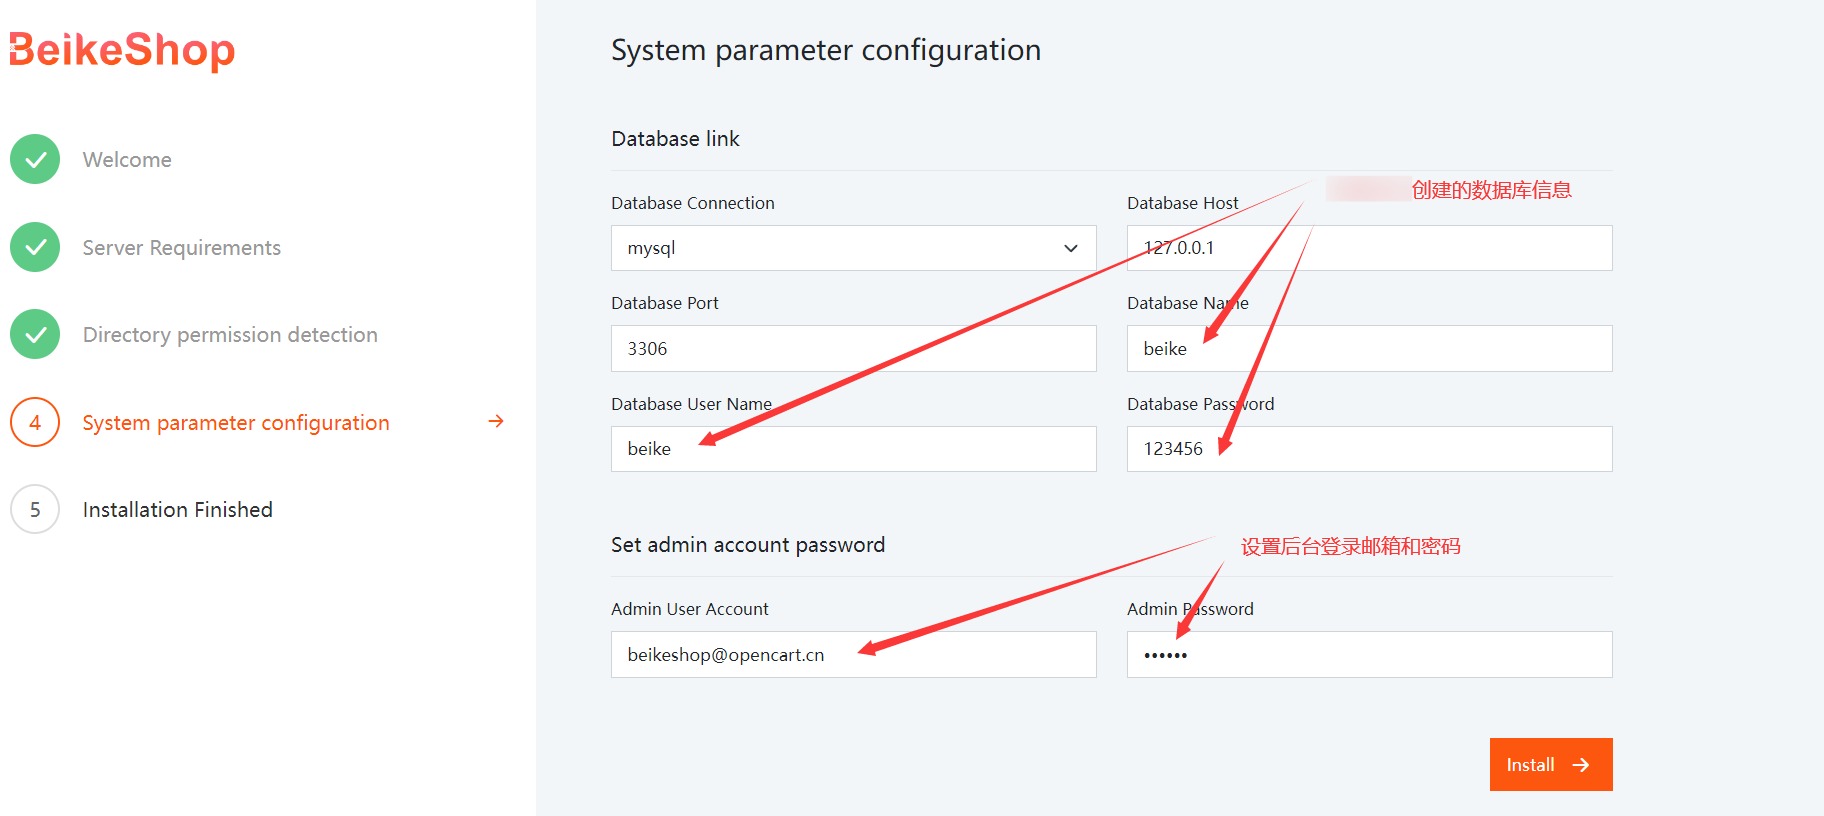
Note: The field "Set admin account password" will only appear after the system successfully verifies the Database information.
Step 5: Installation successful. If the page shown in the figure appears, the installation has been completed successfully.
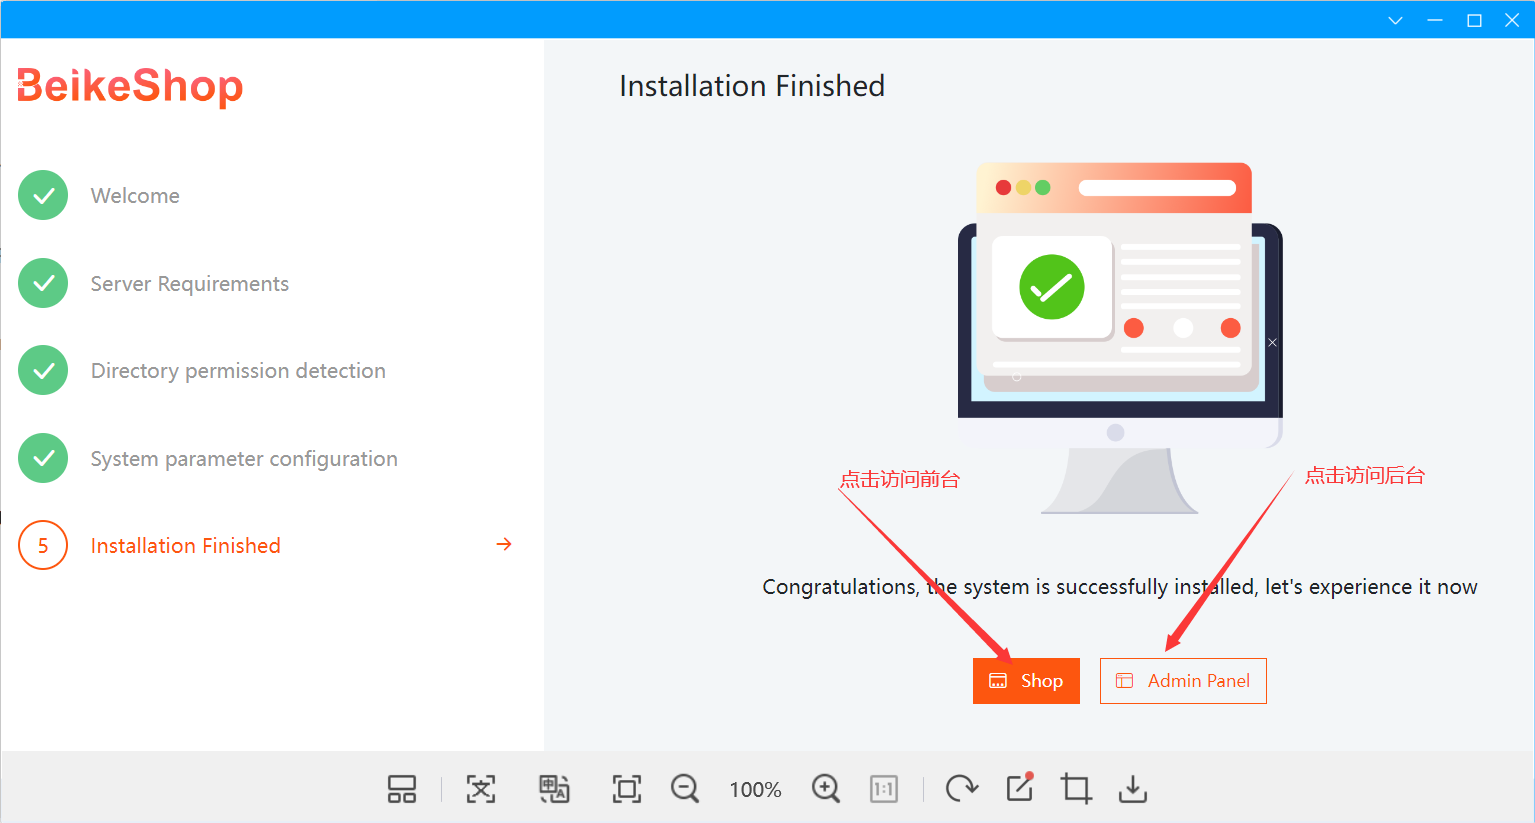
# 5. Shopping Mall Interface
Frontend Interface

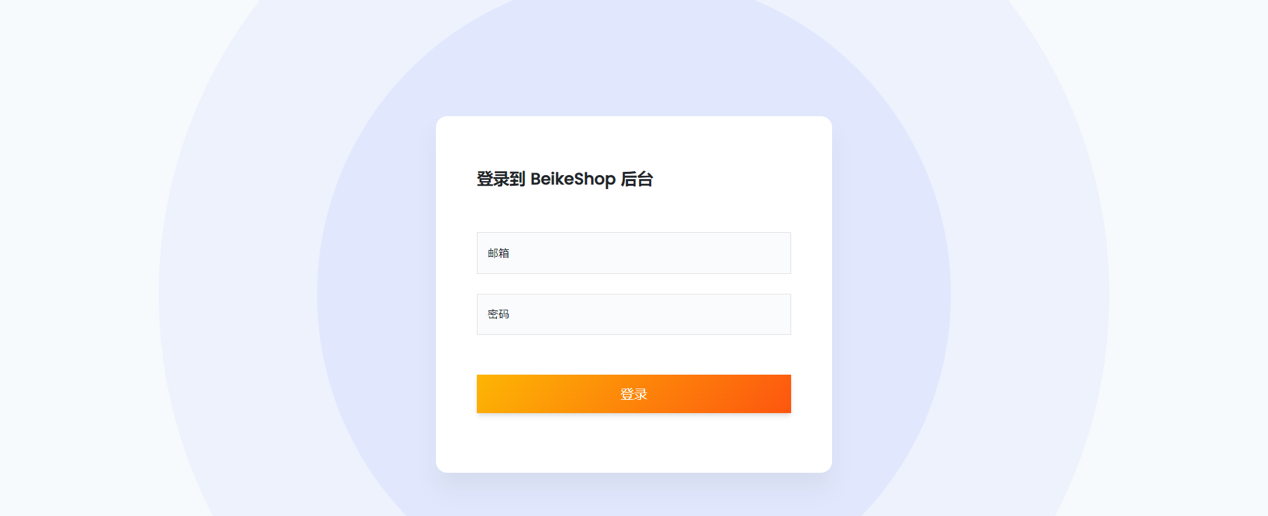
Backend Interface
TIP
This is the end of the installation tutorial. You can use the system now!
If you have any other questions, please contact marketing@guangda.work / QQ:9358972
For common issues during the installation process, please refer to: FAQ– Installation Issues